加载流程、预加载以及通信
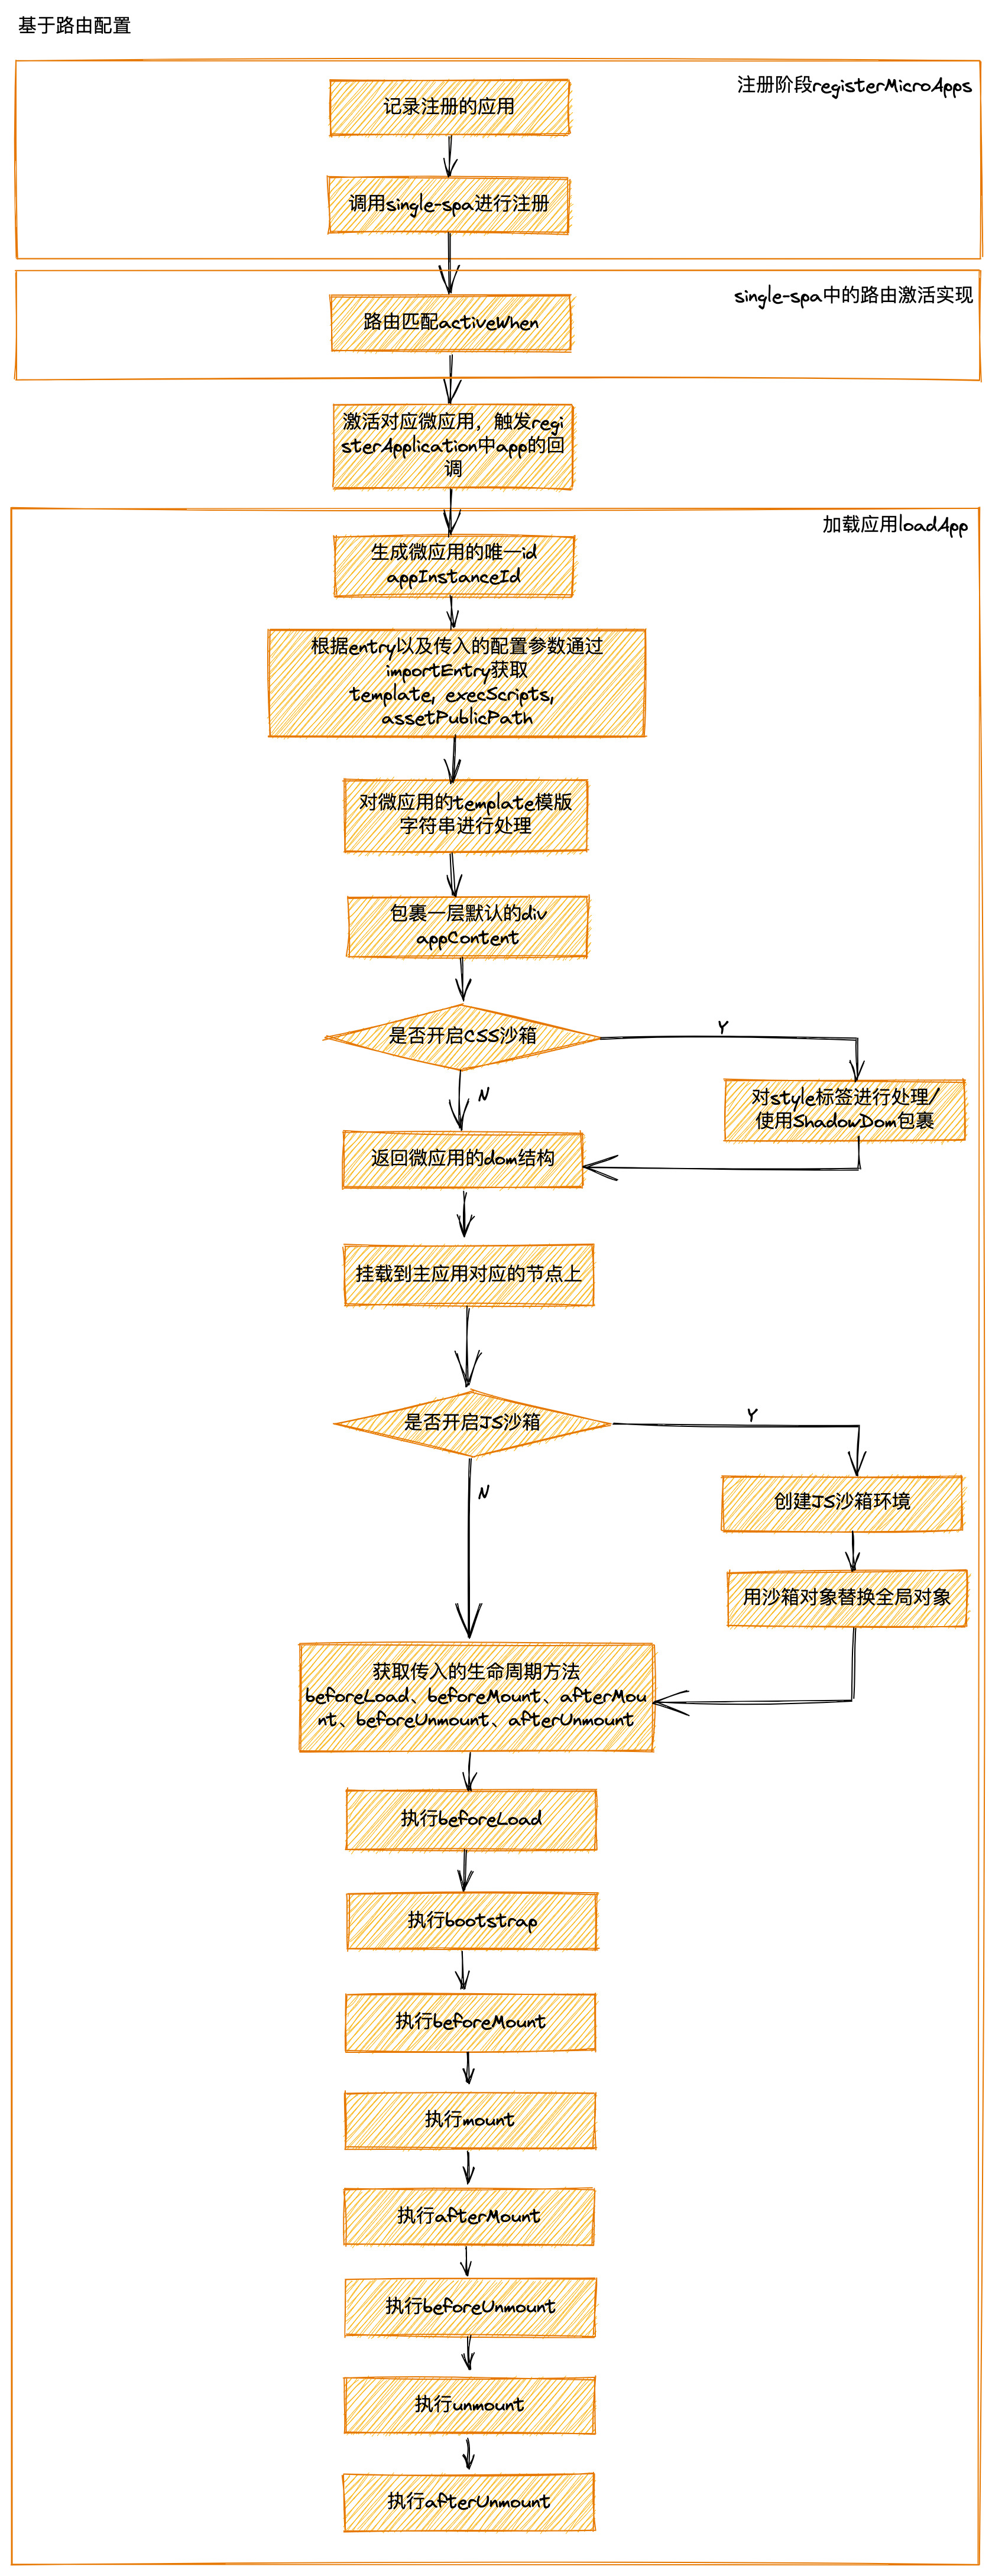
应用加载流程
预加载微应用——preFetch
预加载微应用就是在浏览器空闲的时候预加载微应用的静态资源,从而加快微应用打开的速度
也就是当我们打开微应用时从缓存中去拿所需的资源
通过QianKun的官方文档我们可以知道有两种方式开启微应用的预加载功能
-
基于路由配置
import { registerMicroApps, start } from 'qiankun'; registerMicroApps(...) // 配置预加载,默认为true start({ prefetch: true })- 配置为
true则会在第一个微应用 mount 完成后开始预加载其他微应用的静态资源 - 配置为
'all'则主应用start后即开始预加载所有微应用静态资源 - 配置为
string[]则会在第一个微应用 mounted 后开始加载数组内的微应用资源 - 配置为
function则可完全自定义应用的资源加载时机
下面我们进入源码进行解析:
一、启动应用
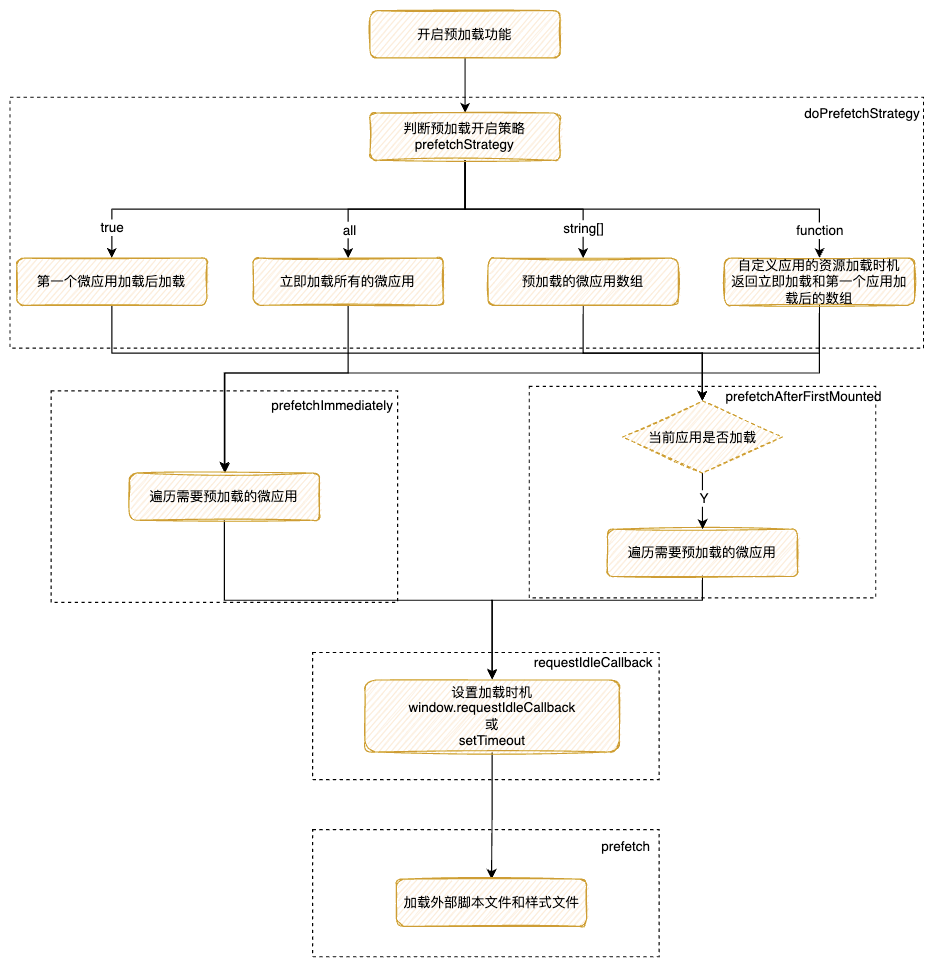
export function start(opts: FrameworkConfiguration = {}) {
  frameworkConfiguration = { prefetch: true, singular: true, sandbox: true, ...opts };
  const {
    prefetch,
    sandbox,
    singular,
    urlRerouteOnly = defaultUrlRerouteOnly,
    ...importEntryOpts
  } = frameworkConfiguration;

	// 如果开启了prefetch预加载,进入预加载策略函数
  if (prefetch) {
    doPrefetchStrategy(microApps, prefetch, importEntryOpts);
  }
	...
}
二、doPrefetchStrategy:针对开启不同的预加载模式进行加载
export function doPrefetchStrategy(
  apps: AppMetadata[],
  prefetchStrategy: PrefetchStrategy,
  importEntryOpts?: ImportEntryOpts,
) {
  const appsName2Apps = (names: string[]): AppMetadata[] => apps.filter((app) => names.includes(app.name));

	// prefetchStrategy 是数组
  if (Array.isArray(prefetchStrategy)) {
    prefetchAfterFirstMounted(appsName2Apps(prefetchStrategy as string[]), importEntryOpts);
  }
	// prefetchStrategy 是函数
	else if (isFunction(prefetchStrategy)) {
    (async () => {
      // critical rendering apps would be prefetch as earlier as possible
      const { criticalAppNames = [], minorAppsName = [] } = await prefetchStrategy(apps);
      prefetchImmediately(appsName2Apps(criticalAppNames), importEntryOpts);
      prefetchAfterFirstMounted(appsName2Apps(minorAppsName), importEntryOpts);
    })();
  } else {
    switch (prefetchStrategy) {
      case true:
        prefetchAfterFirstMounted(apps, importEntryOpts);
        break;

      case 'all':
        prefetchImmediately(apps, importEntryOpts);
        break;

      default:
        break;
    }
  }
}
根据加载的时机不同分为两个方式
prefetchAfterFirstMounted首个应用加载完毕后开始预加载,另一个是prefetchImmediately立即开始预加载三、prefetchImmediately/prefetchAfterFirstMounted遍历预加载应用
- prefetchImmediately:直接遍历微应用
export function prefetchImmediately(apps: AppMetadata[], opts?: ImportEntryOpts): void { ... // 遍历微应用获取入口文件和配置信息开始预加载 apps.forEach(({ entry }) => prefetch(entry, opts)); }- prefetchAfterFirstMounted:判断当前微应用是否加载
function prefetchAfterFirstMounted(apps: AppMetadata[], opts?: ImportEntryOpts): void {
  // single-spa:first-mount监听应用是否已经加载
	window.addEventListener('single-spa:first-mount', function listener() {
    // 获取未加载的应用
		const notLoadedApps = apps.filter((app) => getAppStatus(app.name) === NOT_LOADED);

    if (process.env.NODE_ENV === 'development') {
      const mountedApps = getMountedApps();
      console.log(`[qiankun] prefetch starting after ${mountedApps} mounted...`, notLoadedApps);
    }

    notLoadedApps.forEach(({ entry }) => prefetch(entry, opts));

    window.removeEventListener('single-spa:first-mount', listener);
  });
}
区别就在于多了一层判断,是否在当前应用加载前还是加载后
四、prefetch进行预加载
// 开始进行预加载
function prefetch(entry: Entry, opts?: ImportEntryOpts): void {
  ...
	// 设置获取外部引入的脚本文件和样式文件的加载时机
  requestIdleCallback(async () => {
    const { getExternalScripts, getExternalStyleSheets } = await importEntry(entry, opts);
    requestIdleCallback(getExternalStyleSheets);
    requestIdleCallback(getExternalScripts);
  });
}

// 设置加载时间的事件
const requestIdleCallback =
  window.requestIdleCallback ||
  function requestIdleCallback(cb: CallableFunction) {
    const start = Date.now();
    return setTimeout(() => {
      cb({
        didTimeout: false,
        timeRemaining() {
          return Math.max(0, 50 - (Date.now() - start));
        },
      });
    }, 1);
  };
核心是调用浏览器的空闲时间进行资源的加载,优先使用
window.requestIdleCallback,否则通过setTimeout - 配置为
-
手动加载
import { prefetchApps } from 'qiankun';

prefetchApps([
  { name: 'app1', entry: '//localhost:7001' },
  { name: 'app2', entry: '//localhost:7002' },
]);
此处的
prefetchApps同上面的**prefetchImmediately**
应用通信
常见的通信方式大概分为以下几个:
通过URL:使用简单,操作方便适应于一些不太复杂的场景通过Props:适用于主子应用之间的传值,当层级结构太深时数据流不清晰通过发布/订阅模式:一对多的关系,发布者和订阅者是解耦的,使用不当情况下可能会造成数据流的混乱通过状态管理:统一管理,适合复杂场景通过session、localStorage等:对存储大小有所限制,容易造成数据的丢失比如存储function等
笔者这边就不对通过URL、通过Props、通过session、localStorage等进行详细的说明了,主要是对通过发布/订阅模式和通过状态管理进行讲解
发布/订阅!!
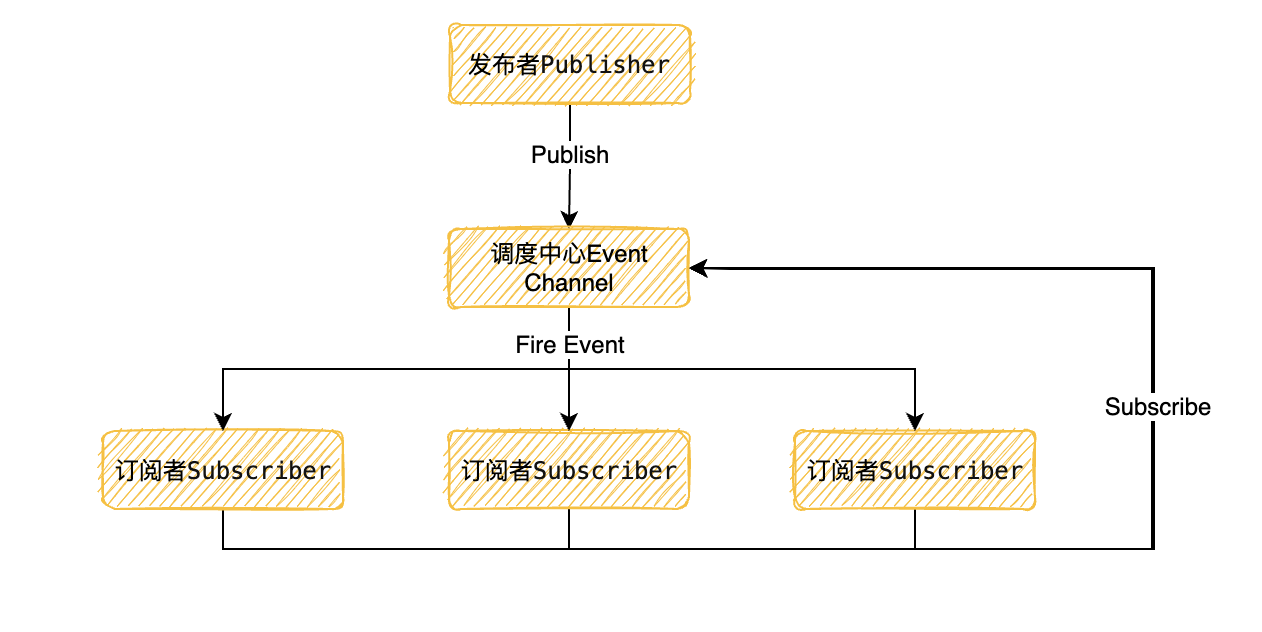
简易的发布/订阅
根据上图我们可以知道实现一个发布订阅我们至少需要四个点:
- 一个发布者对象
- 一个订阅者,订阅事件
- 缓存队列存放订阅回调
- 一个调度中心当我们发布消息时遍历缓冲列表,依次通知订阅者
class EventEmitter {
    constructor() {
        this.eventMap = new Map()
    }

    subscribe (type, handler) {
        if (!(handler instanceof Function)) {
            throw new Error('handler must be a function!')
        }

        if(!this.eventMap.get(type)) {
            this.eventMap.set(type, [])
        }

        this.eventMap.get(type).push(handler)
    }

    emit (type, ...args) {
        const queue = this.eventMap.get(type)
        if(queue) {
            queue.forEach(handler => {
                handler(...args)
            });
        }
    }

    unSubscribe (type, handler) {
        if (handler) {
            const queue = this.eventMap.get(type)
            queue.splice(queue.indexOf(handler), 1)
        } else {
            this.eventMap.delete(type)
        }
    }
}

const myEvent = new EventEmitter()

const handler = (...args) => {
    console.log('事件被触发了', ...args)
}

myEvent.subscribe('test', handler)

myEvent.emit('test', 'lalalla')

// 事件被触发了 lalalla
QianKun中的initGlobalState
通过阅读QianKun的文档我们可以知道,在QianKun中我们是通过****initGlobalState(state)****
定义全局状态的,通过该方法返回一个MicroAppStateActions实例,并且一次暴露三个方法:
- onGlobalStateChange:全局依赖监听
- setGlobalState:设置全局状态
- offGlobalStateChange:销毁监听
从本质上来看其实*initGlobalState也是遵循了发布订阅模式*
我们看下官方示例:
主应用:
import { initGlobalState, MicroAppStateActions } from 'qiankun';

// 初始化 state
const actions: MicroAppStateActions = initGlobalState(state);

actions.onGlobalStateChange((state, prev) => {
  // state: 变更后的状态; prev 变更前的状态
  console.log(state, prev);
});
actions.setGlobalState(state);
actions.offGlobalStateChange();
子应用:
// 从生命周期 mount 中获取通信方法,使用方式和 master 一致
export function mount(props) {
  props.onGlobalStateChange((state, prev) => {
    // state: 变更后的状态; prev 变更前的状态
    console.log(state, prev);
  });

  props.setGlobalState(state);
}
onGlobalStateChange对应简易的发布订阅中的subscribe,setGlobalState对应publish
下面我们进入源码看看是如何实现的:

这里有两个值提前说明以下:
- globalState:全局状态
- deps:函数缓存列表
initGlobalState:初始化全局的State
export function initGlobalState(state: Record<string, any> = {}) {
	...
  if (state === globalState) {
    console.warn('[qiankun] state has not changed!');
  } else {
    const prevGlobalState = cloneDeep(globalState);
    globalState = cloneDeep(state);
		// 触发全局监听
    emitGlobal(globalState, prevGlobalState);
  }
	// 返回MicroAppStateActions实例
  return getMicroAppStateActions(`global-${+new Date()}`, true);
}
emitGlobal:触发全局回调
function emitGlobal(state: Record<string, any>, prevState: Record<string, any>) {
  Object.keys(deps).forEach((id: string) => {
    if (deps[id] instanceof Function) {
			// 触发全局状态改变后的回调函数
      deps[id](cloneDeep(state), cloneDeep(prevState));
    }
  });
}
getMicroAppStateActions:返回MicroAppStateActions实例
-
onGlobalStateChange:全局依赖监听onGlobalStateChange(callback: OnGlobalStateChangeCallback, fireImmediately?: boolean) { ... // 把回调函数存入缓存列表中 deps[id] = callback; // 当设置fireImmediately为true时,立即执行回调函数 if (fireImmediately) { const cloneState = cloneDeep(globalState); callback(cloneState, cloneState); } } -
setGlobalState:设置全局状态setGlobalState(state: Record<string, any> = {}) { if (state === globalState) { console.warn('[qiankun] state has not changed!'); return false; } const changeKeys: string[] = []; const prevGlobalState = cloneDeep(globalState); // 返回合并以后新的state globalState = cloneDeep( Object.keys(state).reduce((_globalState, changeKey) => { // 主应用更改或者是globalState的属性 if (isMaster || _globalState.hasOwnProperty(changeKey)) { changeKeys.push(changeKey); return Object.assign(_globalState, { [changeKey]: state[changeKey] }); } console.warn(`[qiankun] '${changeKey}' not declared when init state!`); return _globalState; }, globalState), ); if (changeKeys.length === 0) { console.warn('[qiankun] state has not changed!'); return false; } // 触发全局状态改变后的回调函数 emitGlobal(globalState, prevGlobalState); return true; }他这里的处理只希望主应用去新增值,微应用去变更已经有的值
-
offGlobalStateChange:销毁监听offGlobalStateChange() { delete deps[id]; return true; } -
挂载到子应用的props
// loadApp
const { onGlobalStateChange, setGlobalState, offGlobalStateChange }: Record<string, CallableFunction> =
	   getMicroAppStateActions(appInstanceId);

// mount阶段
async (props) => mount({ ...props, container: appWrapperGetter(), setGlobalState, onGlobalStateChange })
状态管理
由于这部分不涉及源码,因此这边只讲个思路
在主应用中增加状态管理,比如如果主应用是Vue的话就是vuex store,React的话就把redux中的store传下去
1、****主应用向微应用传递store实例,有**两种传值方式
-
基于路由配置
registerMicroApps( [ { name: 'app1', entry: '//localhost:8080', container: '#container', activeRule: '/react', props: { // 放在这里,props里的值为主应用传给子应用的数据 store: store, }, }, ], { beforeLoad: (app) => console.log('before load', app.name), beforeMount: [(app) => console.log('before mount', app.name)], }, ); -
手动加载
loadMicroApp({
  name: 'app1',
  entry: '//localhost:1234',
  container: this.containerRef.current,
  props: { store: store },
})
2、子应用使用主应用的store实例
// 在mount生命周期获取
function mount(props) {
  // 此时props中含有store
  render(props);
}

// render中使用
function render(props) {
	// 对store进行处理
  const { container } = props;
  ReactDOM.render(<App />, container ? container.querySelector('#root') : document.querySelector('#root'));
}